Refinish Knotty Pine Cabinets Like a Pro with These Tips
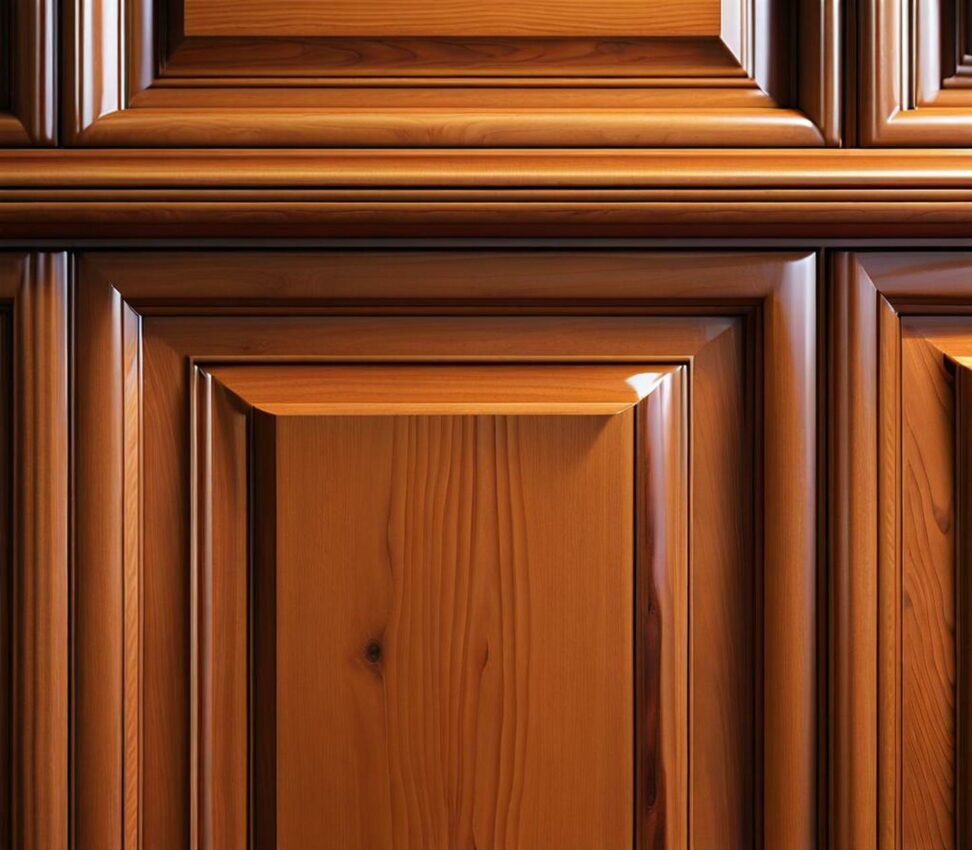
Knotty pine cabinets exude a rustic, homey charm that never goes out of style. But over time, that warm wood finish can start to look dull, faded, or just plain dated. Luckily, refinishing those cabinets is an easy DIY project that breathes new life into your kitchen without the high price tag of a full remodel.
With the right supplies, techniques, and a little bit of elbow grease, you can make those cabinets look like new again. Let's get started!
Gather Your Refinishing Supplies
Before diving into the refinishing process, you'll need to gather a few key supplies:
- Sandpaper - Start with a coarse 100 grit paper to remove the old finish, then use progressively finer grits for smoothing and prep between varnish coats.
- Rags - Have plenty on hand for wiping away dust and applying stains/conditioners.
- Paintbrushes - Angled sash brushes work well for coating cabinet surfaces with varnish.
- Wood varnish - Choose a clear, polyurethane-based varnish in your desired finish (glossy to matte).
- Wood conditioner (optional) - Helps soft pine stain evenly.
- Cleaning supplies - For removing grime and preparing the wood for refinishing.
- Safety gear - Masks, gloves, and drop cloths help keep the project clean.
Prep Cabinets for a Smooth Refinish
Prepping your knotty pine cabinets is one of the most important steps for achieving an even, professional-looking refinished surface.
Remove Doors, Drawers, and Hardware
It will be much easier to refinish your cabinets if you first detach the doors, drawers, pulls, and hinges. Set all hardware pieces aside in a safe area.
For doors, simply unscrew the hinges to lift them off. Drawers should slide right out after unscrewing any rail brackets or supports.
Clean Inside and Out
Give the cabinet boxes, doors, and drawers a thorough cleaning to remove built-up dust, grease, or grime. An all-purpose cleaner works well. For stubborn spots, try a degreaser.
Be sure to wear rubber gloves when cleaning! Rinse surfaces well and let dry fully before moving onto sanding.
Sand Away the Existing Finish
Use 100-120 grit sandpaper to sand down all cabinet surfaces, inside and out. This helps the new varnish adhere and removes any gloss or sheen from the prior finish.
Pay special attention when sanding areas with pine knots, as they tend to absorb stain differently than surrounding wood. The coarser sanding helps level these areas.
Thoroughly wipe away all sanding residue with a dry cloth. Compressed air also helps remove dust from crevices.
Stain Cabinets for a Color Change
If you wish to alter the color of your knotty pine cabinets, staining them is the next step. For a natural wood look, skip ahead to varnishing.
Apply Wood Conditioner
Using a wood conditioner before staining pine can help the stain absorb more evenly into the soft wood, preventing blotchiness.
Brush a thin layer of conditioner over all surfaces and let it penetrate for 5-15 minutes. Then wipe or lightly sand away any excess.
Stain and Seal the Wood
With the conditioner dried, you can apply your chosen stain color. Use a clean rag to wipe the stain over the wood. Allow to dry fully before sealing or varnishing.
Multiple coats of stain will produce a deeper color. For a light, natural look, one coat is often sufficient.
Once the stain has dried, apply a wood sealant to protect the color if you wish.
Varnish Cabinet Exteriors
Now comes time to apply the protective wood varnish. Work in a well-ventilated room, and properly ventilate the fumes.
Using a high-quality natural bristle brush, apply a thin, even layer of oil-based varnish to the cabinet exteriors. Avoid drips or pooling.
Allow the varnish to dry for at least 24 hours before sanding or adding another coat. The long dry time ensures proper curing.
Varnish Cabinet Interiors
Once the exterior varnish has fully cured, do a light sanding with fine 220 grit paper to smooth any dust nibs or imperfections. Wipe clean.
You can then apply the first coat of varnish to the cabinet interiors. Use a small sash brush for best coverage.
Again, let the varnish cure for 24 hours before sanding and adding more layers. The interior varnish protects the raw wood from spills and moisture.
Build Up the Finish with More Varnish
A second or third coat of varnish on your knotty pine cabinets will provide added protection and a richer, deeper finish.
Lightly sand and wipe cabinets to remove any dust between coats. Then recoat the exteriors, wait 24 hours, sand again, and finish with a fresh coat on the interiors.
The more varnish layers, the darker your cabinets will become. Two coats are usually sufficient for good coverage.
Finishing Touches to Complete the Job
Once your final varnish coat has fully cured and hardened, you can reassemble the cabinets to complete the renewal process.
Carefully rehang doors and replace any drawer rails or supports. Make sure doors are aligned properly before fully tightening hinges.
Reattach hardware like knobs and pulls. Consider applying a protective finish to any metal surfaces to prevent tarnishing over time.
Finally, avoid hanging anything on cabinets or loading them up for a few days. This gives the varnish time to fully harden before use.
Maintaining That Fresh Refinished Look
To keep your handiwork looking pristine, take steps to properly care for your refreshed knotty pine cabinets.
Use a soft rag dampened with a mild cleaner to gently wipe down exterior surfaces as needed. Avoid using abrasive scouring pads or scrubbing aggressively.
For extra protection, apply a fresh coat of varnish every few years or when you notice worn areas starting to appear. Focus on high-traffic spots like edges and handles.
With proper care and maintenance, your renewed knotty pine finish will look amazing for years to come!
As you can see, refinishing those dated knotty pine cabinets is actually a pretty straightforward DIY project, even for first-timers. With some mild sanding, staining or varnishing, you can bring back that beautiful wood grain pattern and warm, rustic vibe.
Just be sure to properly prep the cabinets, work in well-ventilated areas, allow ample drying time between coats, and apply the varnish carefully for smooth, even coverage. Following the steps above will have your cabinets looking refreshed and renewed in no time.
Refinishing allows you to upgrade your kitchen on a budget, while still enjoying the timeless appeal of real wood cabinets. So tackle the project this weekend and see how a simple refinish can make your knotty pine cabinets look brand new again!